Multiple Mice Input in Unity

I’m a big fan of local multiplayer – as far as I’m concerned, being bundled up with your mates cajoling each other and screaming at the TV is the very essence of gaming. I had an absolute blast at the recent Hugs ‘n Uppercuts local multiplayer event in Norwich, playing the likes of Gang Beasts, Nidhogg, Friendship Club etc.

CLYp9gfWwAAv7JR.jpg large

Multiplayer games where players use joypads for input is easy – just connect additional USB/wireless controllers and away you go (AFAIK, Unity supports up to 11, which is a strange limit, but there you go…). But what about local multiplayer games where players use a mouse for input? I’m not aware of any such games, but I couldn’t think of a valid reason why not to try. Perhaps it’s simply the logistics of having enough surface space on which to operate the mice… or perhaps it’s because it turns out to be a bit of a technical challenge….

Connecting additional USB mice is, at first glance, just as easy as connecting additional USB joysticks. And Windows will recognise them just fine too. The problem is that every mouse will control the same, single cursor. And, if you ask Unity’s Input class for the mousePosition, or to GetMouseButtonDown(), you’ll get the response from all connected mice, with no way to distinguish them.

Recognising the mice separately requires hooking into the Raw Input events at the OS level. This needs a native (non-managed) plugin, so this solution is very much Windows-specific. There’s probably an equivalent for Mac/Linux, but who cares about those? Not me.

While researching this problem, I came across a few relevant projects:

So, I rolled my sleeves up and hacked together various bits of the above into a Frankenstein-ish solution. It supports both 32/64 bit and will work in the editor and in a standalone build, though not a web build. To capture the mouse input, the program needs to create a window handle via System.Forms. Unity doesn’t really support System.Forms, and it will throw some warnings in the Editor (not in a build though), but it will (should) work just fine after that. Tested with up to 4 mice on Windows 8.1 64 bit and it works fine.

To use, you need to copy both the following dlls into the /Plugins directory of your project.

And the following script shows basic usage to access 4 mice:

using UnityEngine;
using System;
using System.Collections;
using System.Collections.Generic;
using System.Linq;
using System.Text;
using RawMouseDriver;
using RawInputSharp;

public class MouseInput : MonoBehaviour {

    RawMouseDriver.RawMouseDriver mousedriver;
    private RawMouse[] mice;
    private Vector2[] move;
    private const int NUM_MICE = 4;

    // Use this for initialization
    void Start () {
        mousedriver = new RawMouseDriver.RawMouseDriver ();
        mice = new RawMouse[NUM_MICE];
        move = new Vector2[NUM_MICE];
    }

    void Update() {
        // Loop through all the connected mice
        for(int i=0; i<mice.Length; i++){
            try { 
                mousedriver.GetMouse(i, ref mice[i]);
                // Cumulative movement
                move[i] += new Vector2(mice[i].XDelta, -mice[i].YDelta);
            }
            catch {  }
        }
    }

    void OnGUI(){
        GUILayout.Label("Connected Mice:");
        for(int i=0; i< mice.Length; i++){
            if(mice[i] != null)
                GUILayout.Label("Mouse[" + i.ToString() + "] : " + move[i] + mice[i].Buttons[0] + mice[i].Buttons[1]);
        }
    }

    void OnApplicationQuit()
    {
        // Clean up
        mousedriver.Dispose ();
    }
}

And here it is in action:

Posted in Game Dev | Tagged , , , , | 3 Comments

Learnings from Unite 2015

I spent the last three days having a lovely time in Amsterdam attending the Unite Europe 2015 conference. This is just a place for me to gather my notes/thoughts while they’re still in my head:


  • Iestyn Lloyd’s (@yezzer) Dropship demo and his other diaromas are built pretty much entirely with assets and effects from the asset store, including: Orbital reentry craft model by Andromeda, Winter shaders (for the frost effect), RTP and Terrain composer (terrain, obv.), Allsky (skyboxes), Colorful (colour grading/filters), SE natural bloom & dirty lens, SSAO Pro, Amplify motion (effects), and Allegorithmic Substance (texturing)


  • Static Sky is a nice-looking touch-controlled squad shooter for iPad, and the developers have worked out some smart techniques for intuitive camera control and touch input such as dynamically stretching hitboxes in screenspace for interactive objects so that even fat-fingered players’ intentions can be interpreted correctly (clicking close to an enemy will likely be interpreted as the player’s intention to attack that enemy, rather than simply walking up and standing next to them).


  • Lots of new audio stuff in Unity 5 deserves playing with, including the ability to create hierarchical audiomixer groups, transitioning between audiomixer snapshots, and the ability to create audio plugins for, e.g. realtime dynamic effects (vocodering of voices, or programmatic raindrops, for example)
  • Assets for the Blacksmith demo are interesting and worthy of a download to examine, particularly the custom hair and skin shaders

  • The Unity Roadmap is now public, so you can check out what features are coming up.
Posted in Game Dev | Tagged , | Leave a comment

Modding Mario

Video footage of the two finalists in the recent 2015 “Nintendo World Championship” competing in speedruns of customised Super Mario Bros levels has generated some excitement for the upcoming “Mario Maker” game.


It’s quite fun to watch the competitors react to the unexpected level features, and some thought has gone into their entertaining, challenging design, but I struggled to find anything new here: fan-made games have allowed you to customise Mario games for some time now, not just with new maps, but with completely novel gameplay features.

Super Mario Crossover, for example, lets you play through all the Super Mario Bros levels as classic Nintendo characters including Link, Samus Aran, Simon Belmont, and Megaman. And these aren’t just skins slapped in place of Mario– each character recreates their own unique skills and mechanics from their original games – Samus can roll into a ball and lay bombs to blow up Goombas, for example.

image


Then there’s the brilliant Mari0, which combines Mario with Portal mechanics:

https://i0.wp.com/stabyourself.net/images/mari0screens/mari0-bowser.png 


Super Mario War is a multiplayer, competitive deathmatch style game using Mario mechanics. Full source code is available.

https://i0.wp.com/wii-homebrew.com/images/whb/hb-games/smwscreen3.png


I even recently created my own Mario mod, “Super Mario Team”, which turns Super Mario Bros into a co-operative local multiplayer game that can be played by up to 8 players:

image


My worry is that, with Nintendo now seeking to monetise the modding of Mario through the “Mario Maker” product on Wii U, it seems likely that they will want to close down a lot of these fan-made projects that offer the same (or greater) functionality for free. Nintendo are notoriously protective of their IP, and only a few months ago sent a cease and desist request to the student-made “Super Mario 64 HD”, so if you want to play any of these unofficial Mario games I suggest you do so quickly!

Posted in Game Dev | Tagged , , | Leave a comment

Creating Windowless Unity applications

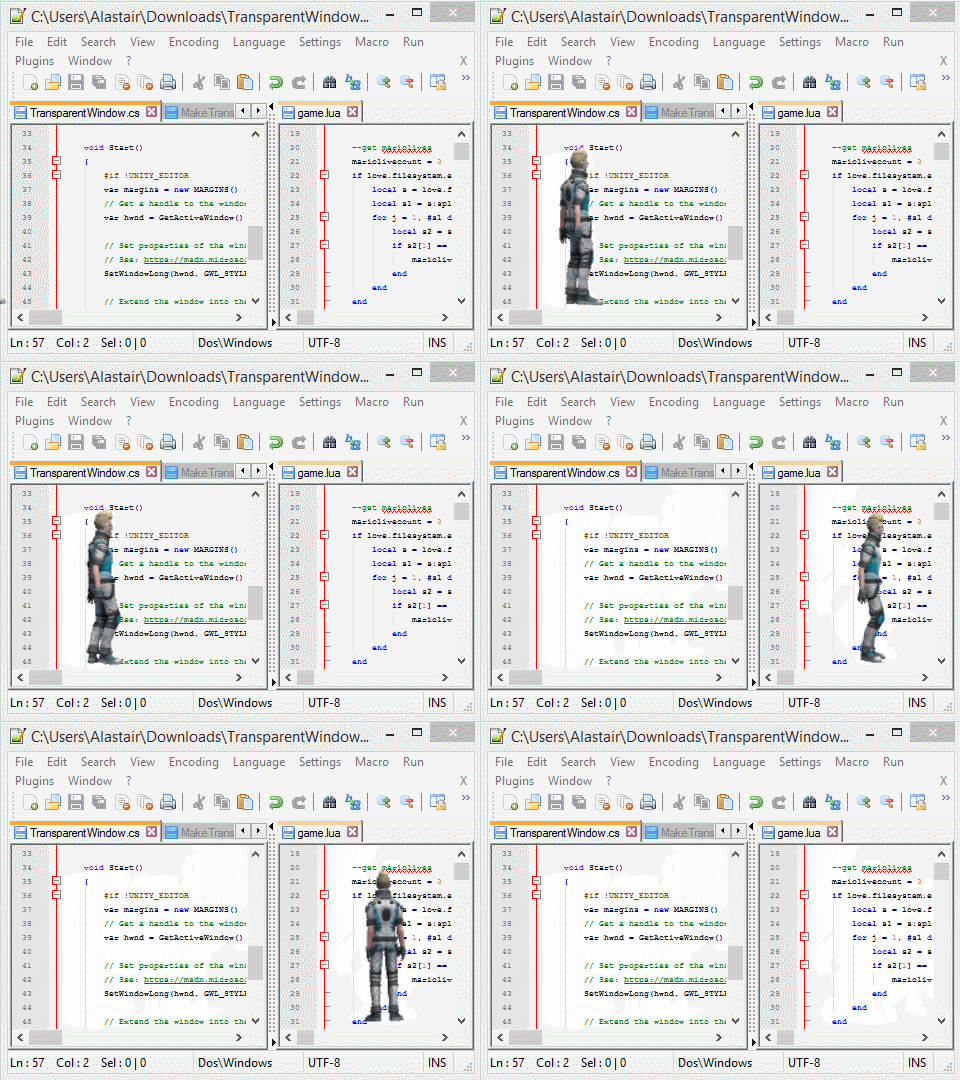
I remember some while back there was a trend for applications to seem integrated with your Windows desktop – animated cats that would walk along your taskbar – things like that… What about a windowless Unity game that used a transparent background to reveal your regular desktop behind anything rendered by the camera?

You can do this using a combination of the OnRenderImage() event of a camera, some calls into the Windows native APIs, and a custom shader. Here’s how:

First, you’ll need to create a custom shader, as follows:

Shader "Custom/ChromakeyTransparent" {
	Properties {
		_MainTex ("Base (RGB)", 2D) = "white" {}
		_TransparentColourKey ("Transparent Colour Key", Color) = (0,0,0,1)
		_TransparencyTolerance ("Transparency Tolerance", Float) = 0.01 
	}
	SubShader {
		Pass {
			Tags { "RenderType" = "Opaque" }
			LOD 200
		
			CGPROGRAM

			#pragma vertex vert
			#pragma fragment frag
			#include "UnityCG.cginc"

			struct a2v
			{
				float4 pos : POSITION;
				float2 uv : TEXCOORD0;
			};

			struct v2f
			{
				float4 pos : SV_POSITION;
				float2 uv : TEXCOORD0;
			};

			v2f vert(a2v input)
			{
				v2f output;
				output.pos = mul (UNITY_MATRIX_MVP, input.pos);
				output.uv = input.uv;
				return output;
			}
		
			sampler2D _MainTex;
			float3 _TransparentColourKey;
			float _TransparencyTolerance;

			float4 frag(v2f input) : SV_Target
			{
				// What is the colour that *would* be rendered here?
				float4 colour = tex2D(_MainTex, input.uv);
			
			    // Calculate the different in each component from the chosen transparency colour
				float deltaR = abs(colour.r - _TransparentColourKey.r);
				float deltaG = abs(colour.g - _TransparentColourKey.g);
				float deltaB = abs(colour.b - _TransparentColourKey.b);

				// If colour is within tolerance, write a transparent pixel
				if (deltaR < _TransparencyTolerance && deltaG < _TransparencyTolerance && deltaB < _TransparencyTolerance)
				{
					return float4(0.0f, 0.0f, 0.0f, 0.0f);
				}

				// Otherwise, return the regular colour
				return colour;
			}
			ENDCG
		}
	}
}


This code should be fairly self-explanatory – it looks at an input texture and, if a pixel colour is within a certain tolerance of the chosen key colour, it is made transparent (you may be familiar with this technique as “chromakey”, or “green/blue screen” used in film special effects).

Create a material using this shader, and choose the key colour that you want to replace (and change the tolerance if necessary). Note that you don’t need to assign the main texture property – we’ll use the output of a camera to supply this texture, which is done in the next step…

Now, create the following C# script and attach to your main camera:

using System;
using System.Runtime.InteropServices;
using UnityEngine;

public class TransparentWindow : MonoBehaviour
{
    [SerializeField]
    private Material m_Material;

    private struct MARGINS
    {
        public int cxLeftWidth;
        public int cxRightWidth;
        public int cyTopHeight;
        public int cyBottomHeight;
    }

    // Define function signatures to import from Windows APIs

    [DllImport("user32.dll")]
    private static extern IntPtr GetActiveWindow();

    [DllImport("user32.dll")]
    private static extern int SetWindowLong(IntPtr hWnd, int nIndex, uint dwNewLong);
    
    [DllImport("Dwmapi.dll")]
    private static extern uint DwmExtendFrameIntoClientArea(IntPtr hWnd, ref MARGINS margins);


    // Definitions of window styles
    const int GWL_STYLE = -16;
    const uint WS_POPUP = 0x80000000;
    const uint WS_VISIBLE = 0x10000000;

    void Start()
    {
        #if !UNITY_EDITOR
        var margins = new MARGINS() { cxLeftWidth = -1 };

        // Get a handle to the window
        var hwnd = GetActiveWindow();

        // Set properties of the window
        // See: https://msdn.microsoft.com/en-us/library/windows/desktop/ms633591%28v=vs.85%29.aspx
        SetWindowLong(hwnd, GWL_STYLE, WS_POPUP | WS_VISIBLE);
        
        // Extend the window into the client area
        See: https://msdn.microsoft.com/en-us/library/windows/desktop/aa969512%28v=vs.85%29.aspx 
        DwmExtendFrameIntoClientArea(hwnd, ref margins);
        #endif
    }

    // Pass the output of the camera to the custom material
    // for chroma replacement
    void OnRenderImage(RenderTexture from, RenderTexture to)
    {
        Graphics.Blit(from, to, m_Material);
    }
}

This code uses InterOpServices to make some calls into the Windows native API that change the properties of the window in which Unity runs. It then uses the OnRenderImage() event to send the output of the camera to a rendertexture. Drag the material to which you assigned the custom transparency shader into the m_Material slot, so that our chromakey replacement works on the output of the camera.

Then, and this is important: change the background colour of the camera to match the _transparentColourKey property of the transparent material.

image

This can be any colour you want, but you might find it easiest to use, say, lime green (0,255,0), or lurid pink (255,0,255).

And then build and run your game (you could enable this in editor mode, by commenting the #if !UNITY_EDITOR condition above, but I really don’t recommend it!). This should work in either Unity 4.x (Pro, since it uses rendertextures), or Unity 5.x any version.

Here’s Ethan from Unity’s stealth demo walking across Notepad++ on my desktop…:

transparent

Posted in Game Dev | Tagged , , | 1 Comment